Introducing WebSell Sync, the central hub of your integrated webstore. This versatile tool seamlessly manages the exchange of vital data, including item details, store information, and customer data, while ensuring a smooth workflow for your online business. Here's a step-by-step guide on how to use WebSell Sync:
Setup
Before diving into configurations, ensure you have two sets of essential information and credentials ready:
Access to Your Physical Store's Database:
- Server name, username, password, and database name.
Access to Your Webstore:
- Webstore or staging URL, username, and password.
Together, these configurations facilitate the flow of data between your database and webstore. While data updates are not in real-time, you can set Sync to upload changes as frequently as every hour, with web orders downloaded every 15 minutes by default.
Configuration
1. Preferences
To ensure continuous operation, select "Start WebSell Sync with Windows" to run Sync automatically after a shutdown or restart.
2. Images
Sync handles image uploads for your products. Create and modify image profiles to control image display across your webstore. Note that Sync does not enlarge images but downsizes them based on profile settings.
3. Follow-up Emails
Sync also sends follow-up emails for each step of the order fulfillment process. Add email addresses to receive copies of these emails.
4. Sync Settings
a. Timed Synchronization Settings:
Choose the frequency for uploading changes to your database based on your available resources and database size. Sync utilizes cache memory to remember previous uploads, optimizing synchronization.
b. WebOrder Alerts:
Select visual and audio alert preferences for new downloaded web orders.
c. Inventory Control:
Opt to subtract inventory immediately upon receiving web orders by selecting "Include unprocessed web order items in quantity committed." This automates inventory reconciliation when orders are processed.
5. Advanced
Sync uses memory cache to enhance performance. If you experience issues with synchronization, you can purge the cache to ensure all changes are uploaded during the next sync.
6. Customers
Customer account numbers and passwords are saved by default. Note that if usernames are disabled in your webstore configurations, customer email addresses will become their account numbers. Storing usernames in the account number field is recommended.
7. Field Mapping
Field mapping defines where information is extracted from and sent to within your database. Be cautious when making changes, and seek assistance from WebSell for any modifications.
8. Web Orders
Web orders can be downloaded into your database by default. You can disable this option if needed. Enable NSc mail integration to send follow-up emails during order processing. You can also purge web order data at regular intervals.
Remember to select 'OK' to save your configurations after making any changes. With WebSell Sync, your integrated webstore operates efficiently, ensuring seamless data exchange between your physical store and online platform.
Clearing Sync Cache
WebSell Sync utilizes a caching system to boost its synchronization speed. This ensures that only data that has changed is uploaded to the server.
During every synchronization, WebSell Sync stores a cache, or a snapshot, of the data on your WebStore. For efficiency, only data that has changed since the last synchronization is uploaded. These changes are computed by comparing the current snapshot with the previous one.
A purge should be performed in this instance to correct the problem.
To clear the cache, try the following (please make sure it's connected to the correct database before trying this):
Go to Sync → Configuration → Advanced → Cache Control → check the box 'Purge the cache when I click OK' > Ok.
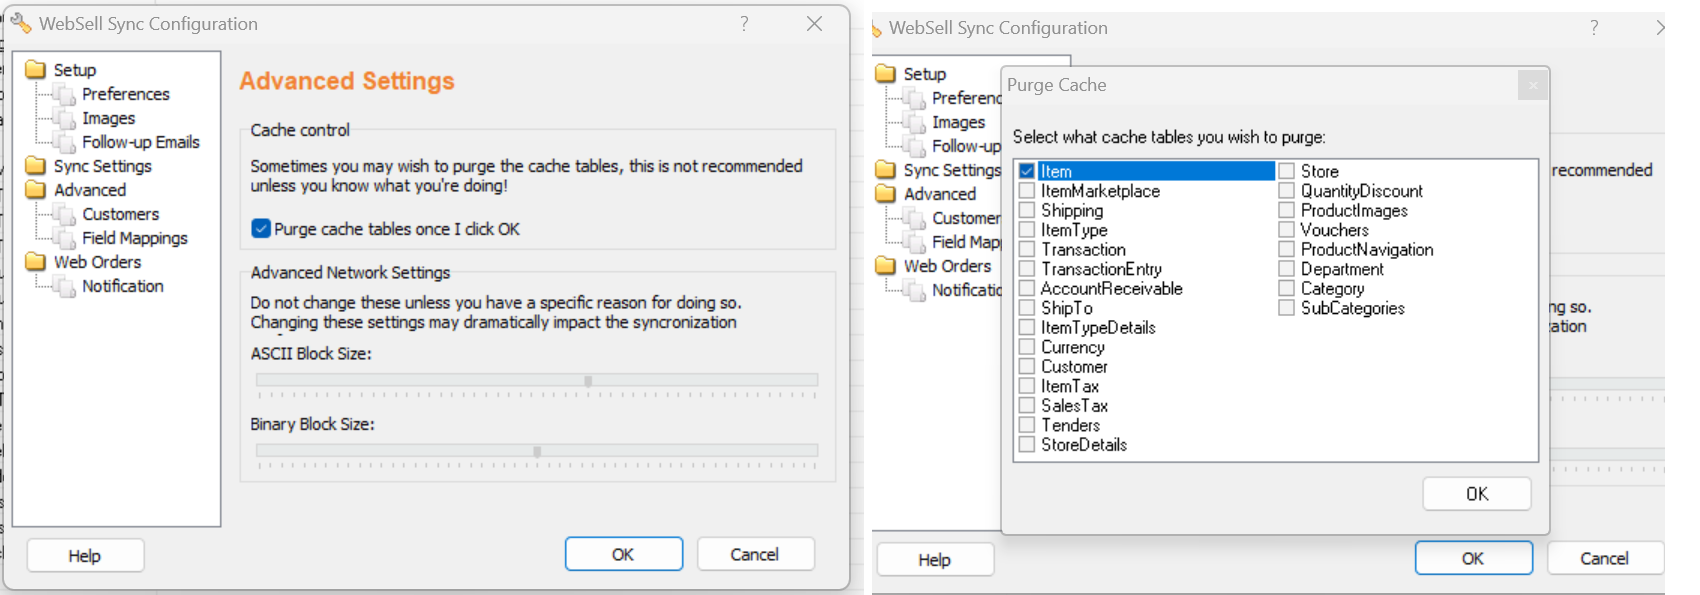
Select the tables that you wish to purge from the list> OK.
To purge all tables, right-click the table list and select "Select All". > OK.
Synchronize.

The cache is rebuilt the next time you synchronize.
The ProductImages cache contains by far the largest amount of data and can usually be de-selected during cache purge operations, unless you are having problems that are specific to images (for example, images not appearing or updating properly). Purging image cache tables usually results in a lengthy synchronization, due to the large size of image files.
Note: Deleting the cache should generally be done only on the suggestion of technical support.
Whenever you purge the cache and you include the customer table, the records of any customer who has never placed an order and had it successfully downloaded into the POS will be deleted during the purging process. This is because when a customer registers on the WebStore, his details will not appear in the POS database until he places an order and that order has been downloaded in the POS during synchronization.
GWO 5 Minute Sync
If you want to achieve synchronization of web orders every 5 min instead of every 15min or 1hr, after setting up GWO (Get Web Orders) software, please do the following steps:
1. Close NSc Sync completely first.
2. Edit config.xml for NSc Sync on the machine here:
%appdata%\Roaming\NitroSell\NSc Sync\config.xml

3. Add this tag inside the <SETTINGS> node in the config:
<WEBORDERCHECKSPERHOUR>12</WEBORDERCHECKSPERHOUR>
4. Save the file.
5. Re-launch sync & ensure timed sync is enabled.
(This option is available in v2.1.50 Build 1773. and newer)
Please note: It will still look as hourly syncs but instead of 1 sync per hour/4 syncs per hour (every 15 mins) it is going to appear as 12 syncs per hour=syncing every 5min.
Managing Sync image profiles
Sync uploads product images from your POS database for use in your WebStore. During upload, images are automatically resized to fit a constrained size on your WebStore.
The image profile configuration grid displays information on existing image profiles, including the following:
Name: Displays the name of the image profile.
Prefix: When an image is uploaded to the WebStore, the file name is assigned a prefix. The prefix is used by the WebStore to identify the copy of that image.
Width: The maximum width of an image after it is automatically resized.
Height: Much like Width, the maximum height of an image after it is automatically resized.
Dir: The name of the picture source directory.
Configuring Image Profiles
To configure an image profile, go to Sync Configuration and select Images section. Then, select the image profile you wish to edit, then click "Edit" to open the Edit Image Settings dialog.
The Image Profile window consists of two types of settings: Image Profile and Post-Processing.
Image Profile Settings
The Profile Settings tab includes the following configuration options:
Profile Name: The name of the profile.
Prefix Name: This option appears only for additional image profiles, not default ones. When an image is uploaded to the WebStore, the filename is assigned a prefix. The prefix is used by the WebStore to identify the copy of that image.
Enable this image profile: Enables you to enable or disable the image profile. This option is enabled by default for default images profiles.
Image Source Directory: The directory that contains the image files for your item pictures.
Enable Image Resizing: Enables you to enable or disable the automatic resizing of images.
Image Compression Level: Enables you to configure the level of compression that is applied to your images after they are automatically resized. The compression level is a trade-off between quality and size. The higher the compression, the faster your image files will load on the Web customer’s machine, however, higher compression results in lower quality images. Lowering the compression level improves the image quality, but at the same time increases the size of the image, causing it to take longer to download.
For optimal results, it is recommended you use the default (~75%) compression level.
Max Width: The maximum width of a product image after it is automatically resized. The maximum recommended width for a product image (default profile) is 300 pixels. The maximum recommended width for a product image (thumbnail profile) is 220 pixels.
Max Height: The maximum height of a product image after it is automatically resized. The maximum recommended height for a product image (default profile) is 300 pixels. The maximum recommended height for a product image (thumbnail profile) is 220 pixels.
Click OK to save any changes.
Post-Processing Settings
The Post-Processing tab includes the following configuration options:
Image Filter dropdown: The post-processing "filter" on the image. The sharpen filters are most useful to ensure crisp product images.
Automatically Crop Whitespace checkbox: If enabled, this option automatically removes any border of white space from your product images.
Creating a new image profile
To create a new image profile, please refer to the following tutorial: How to Create Additional & Alternative Image Profiles for Your E-commerce Store | WebSell - YouTube
Deleting an Image Profile
To delete an image profile, select the image profile, then click Delete. The delete confirmation dialog will be displayed; if you are sure you want to delete the profile, click Yes.